top of page

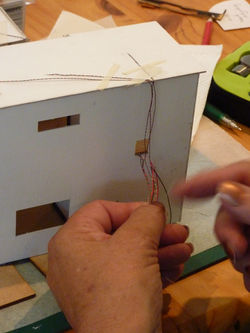
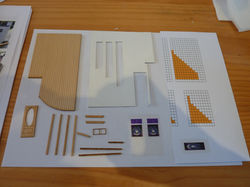
JAN STILLARD'S ART DECO HOUSE WORKSHOP 
IN QUARTER SCALE 

83. flowers & chocolates from the art deco group.JPG
82. As before with Anna & Monica.JPG
81. Back row - Gay, Diane, Jan, Ann & Rosalie. Front row - Jan (tutor) & Charlen
80.burn back the wires to strip down to copper.JPG
79. should open like so.JPG
78. join two sides of the building together with  glue and bias binding.JPG
77. needs to come up this fireplace hole.JPG
76. lift and tuck wiring under back of house.JPG
75. place wiring for lighting down the edge of the building.JPG
74. placement of the house on the base boards.JPG
73. getting the lighting ready.JPG
72. making sure the roof on side A fits into roof of side B.JPG
71. making art deco mirrors.JPG
70. fireplace pieces painted and glued - hearthe, firebox, fireplace surrounds.J
69. making adjustments to the back wall.JPG
68. making the second chimney with a flap for the lighting battery.JPG
67. adjustments to the back wall.JPG
66. making the first chimney & making adjustments to the back wall.JPG
65. cutting the cornices.JPG
64. lunch on Day 2.JPG
63. all three windows would look like this.JPG
62. cutting the glass block windows.JPG
61. the firebox is attached to the back of the building.JPG
60. making the firebox for the fireplace - inside needs to be painted black.JPG
59. skirting boards to be added.JPG
58. gluing all the walls and floors together for the second section of the house
57. making the fireplace.JPG
56. adjust chanel for wires according to shrink wrap connections.JPG
55. blow wave shrink wrap tubing to melt around wires.JPG
54. inset into shrink wrap tubing and cut wires.JPG
53. group wires together, red with red, green with black.JPG
52. burning the wires to strip the plastic away revealing the copper wire only.J
51. getting the wiring for the lighting sorted.JPG
50. side view of the front of house.JPG
49. glue walls in place on ground floor to provide strength for structure.JPG
48. landing balustrade completed.JPG
47. gluing top floor to stairwell.JPG
46. Ann with her completed balustrade - look at the satisfaction on her face.JPG
45. Ann blow waving the balustrade for a better fit.JPG
44. placement of the first balustrade - frustration sets in.JPG
43. all stairs in place - to the landing on the first floor.JPG
42. section one of the stairs complted.JPG
41. gluing the steps in place (can you see the stair guide - should be painted t
40. should look like this.JPG
39. gluing all the front door components to the wall.JPG
38. progressing through the steps.JPG
37. see easy peasy.JPG
36. gluing the curved wall to floor piece.JPG
35. getting the curved wall ready.JPG
34. components on the ready.JPG
33. what's left of lunch on Day 1.JPG
32. lunch break - where is everyone.JPG
31. wall with skirting board attached.JPG
30.measuring skirting boards.JPG
29. door jams (to the left) with architraves (to the right).JPG
28. placement of architraves around the doors.JPG
27. Charlene with her door hardware on the ready.JPG
26. front door with lead glass insert.JPG
25. three types of doors with lead glass inserts.JPG
24. gluing door jams to the doors.JPG
23. progressing through the steps.JPG
22. gluing floorboards to floors (for reinforcement).JPG
21. lighting positioned in chanels, taped down with masking tape.JPG
20. getting chanels ready for the lighting.JPG
19. testing the lighting.JPG
18. Partially opened house.JPG
17. Close up of bedroom 2.JPG
16. Close up of bathroom.JPG
15. Close up of main bedroom.JPG
14. Close up of laundry.JPG
13. Close up of kitchen.JPG
12. Close up of dining room.JPG
11. Close up of lounge room.JPG
10. Top of the Landing & door to balcony.JPG
9. Front door & stairwell.JPG
8. Inside Jan Stillard's House - Side B.JPG
7. Inside Jan Stillard's House - Side A.JPG
6. Side view.JPG
5. Back view.JPG
4. Close up of balcony.JPG
3. Side view.JPG
2. Side view.JPG
1. Jan Stillard's Art Deco House.JPG

Call us:

02- 62410709

Find us at: Weston Creek Community Centre, Parkinson Street, Weston ACT 2611


© 2015 by ACT MINIATURE ENTHUSIASTS

bottom of page